
 博客搭建
博客搭建
# 1.博客搭建
# 1.1使用的工具
- 框架VuePress: https://www.vuepress.cn/ (opens new window)
- 主题vdoing:https://doc.xugaoyi.com/ (opens new window)
- 代码和图床管理工具: https://coding.net/ (opens new window)
- 腾讯服务器: https://cloud.tencent.com (opens new window)
- 图床:typora + PicGo-Core(command line)
# 1.2说明
- 使用vuepress + vdoing搭建框架主题架构。
- 博客的代码和图片分开管理,全部上传至coding中。
- 然后在coding中配置构建计划自动部署至腾讯云服务器。
# 1.3vuepress安装
# 前置安装
nodejs >= 8.6
# 安装插件
npm install -g yarn
# 安装vuepress
yarn global add vuepress
# 下载项目 在项目路径安装依赖
npm install
# 本地启动
yarn dev
# 编译项目并上传coding
yarn deploy  #实际执行 .deploy.sh
1
2
3
4
5
6
7
8
9
10
11
12
2
3
4
5
6
7
8
9
10
11
12
# 1.4deploy.sh内容
#!/usr/bin/env sh
# 确保脚本抛出遇到的错误
set -e
# 生成静态文件
npm run build
# 进入生成的文件夹
cd docs/.vuepress/dist
# deploy to coding
echo 'blog.yueshuge.cn' > CNAME
if [ -z "$CODING_TOKEN" ]; then  # -z 字符串 长度为0则为true;$CODING_TOKEN来自于coding仓库秘钥配置
  codingUrl=git@git.dev.tencent.com:liufei379/blog/blog.git
else
  codingUrl=https://liufei379:${CODING_TOKEN}@git.dev.tencent.com/liufei379/blog/blog.git
fi
git init
git add -A
git commit -m "deploy"
# 将构建后的文件推送到blog分支
git push -f git@e.coding.net:liufei379/blog/blog.git master:blog
cd -
rm -rf docs/.vuepress/dist
1
2
3
4
5
6
7
8
9
10
11
12
13
14
15
16
17
18
19
20
21
2
3
4
5
6
7
8
9
10
11
12
13
14
15
16
17
18
19
20
21
秘钥配置详见:https://help.coding.net/docs/repo/ssh/config.html (opens new window)
# 2.图床设置
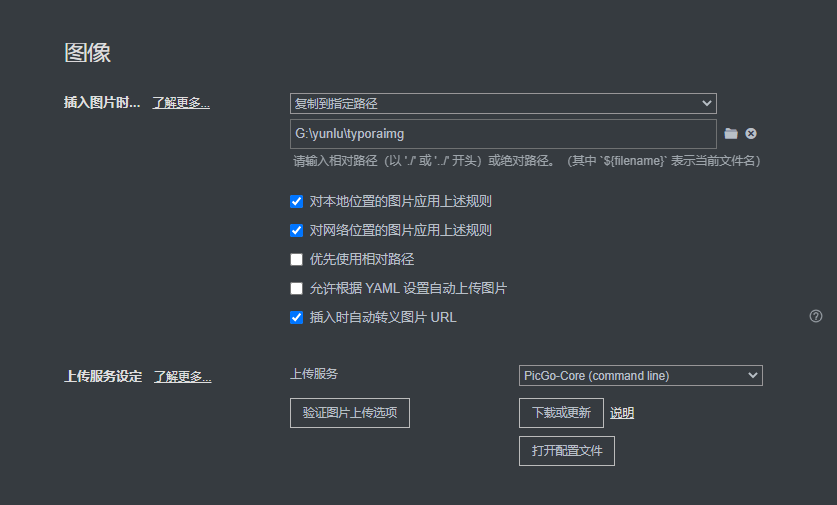
# 2.1 Typora图像设置
- 点击格式->图像->全局图像设置
- 选择复制到指定位置(因为Typora还用于记录一些工作上的内容,不想自动上传图片,如果想要改成自动上传,那么选择修改为上传图片选项)
- 上传服务选择picGo-core(command line)
- 然后点击下载或更新
# 2.2借助picgo安装coding图床插件
- coding图片插件地址:https://github.com/zytomorrow/picgo-plugin-coding
- windows下打开:C:\Users\用户名\AppData\Roaming\Typora\picgo\win64 文件夹,有个picgo.exe程序
- CMD 进入上面的路径,执行 .\picgo.exe install picgo-plugin-coding 安装coding插件
- C:\Users\liufei2\.picgo 修改 config.json
- CMD 进入路径 C:\Users\用户名\.picgo\node_modules\picgo-plugin-coding\src 修改index.js
# config.json修改
{
  "picBed": {
    "current": "coding",
    "uploader": "coding",
    "coding": {
      "token": "在coding->右上角->个人账户设置->访问令牌中添加令牌信息",
      "teamNameProjectName": "liufei379/blog", <!-- /为固定格式 liufei379表示团队名 blog 表示项目名 -->
      "repoNameBranch": "images/master",  <!-- /为固定格式 images表示图片名 master 表示分支名 -->
      "dirStructure": ""
    }
  },
  "picgoPlugins": {
    "picgo-plugin-coding": true  <!-- 表示使用的是coding插件 -->
  }
}
1
2
3
4
5
6
7
8
9
10
11
12
13
14
15
2
3
4
5
6
7
8
9
10
11
12
13
14
15
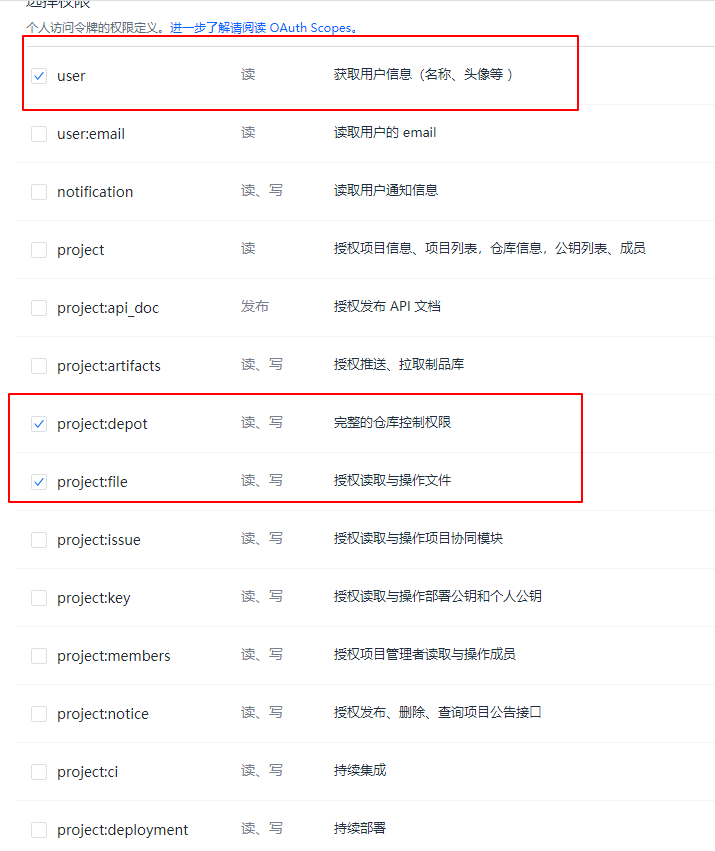
# token配置
需要勾选 user / project:depot / project:file
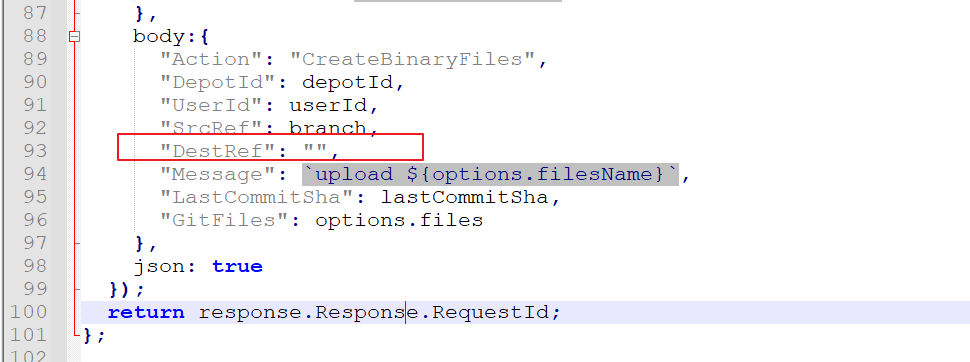
# index.js修改
- 实际上传到coding的地址为:https://liufei379.coding.net/p/blog/d/images/master/${path}${fileName}
- 替换为自己的二级域名:https://cdn.jsdelivr.net/gh/liufei379/images@main/${path}${fileName}

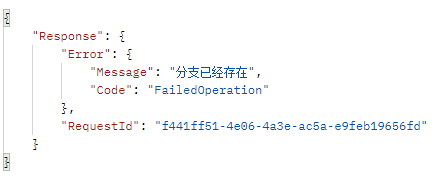
2022年10月25日修改,把DestRef 的值修改成null, 如果不调整上传不上去
# 3.自动构建
- 代码库和图库都需要添加自动构建
- coding中进入项目->持续集成->构建计划->选择"通过账号密码发起的 SSH 连接" (因为我使用私钥他失败了啊,后续有心情再研究)
- 点击保存不做处理,然后点击编辑构建计划->流程配置->文本编辑器
# 博客->流程配置
pipeline {
  agent any
  stages {
    stage('检出') {
      steps {
        checkout([$class: 'GitSCM', branches: [[name: env.GIT_BUILD_REF]],
        userRemoteConfigs: [[url: env.GIT_REPO_URL, credentialsId: env.CREDENTIALS_ID]]])
      }
    }
    stage('构建') {
      steps {
        echo '构建中...'
        sh 'ls'
        // 压缩
        sh 'tar -zcf ./blog.zip ./*'
        sh 'ls'
        echo '构建完成.'
      }
    }
    stage('部署') {
      steps {
        echo '部署中...'
        script {
          def remote = [:]
          remote.name = 'web-server'
          remote.allowAnyHosts = true
          remote.host = '123.207.70.143'
          remote.port = 22
          remote.user = 'root'

          // 把「CODING 凭据管理」中的「凭据 ID」填入 credentialsId,而 username paswword 不用改
          withCredentials([usernamePassword(credentialsId: "点击项目配置->开发者选项->凭据管理->录入凭据->凭据类型选择用户名+密码", usernameVariable: 'username', passwordVariable: 'password')]) {
            remote.user = username
            remote.password = password
            // SSH 上传文件到远端服务器
            sshPut remote: remote, from: '/root/workspace/blog.zip', into: '/opt/work/blog/'
            //解压缩
            sshCommand remote: remote, command: "tar -zxf /opt/work/blog/blog.zip -C /opt/work/blog/"
            // 删除压缩包
            sshCommand remote: remote, sudo: true, command: "rm -rf /opt/work/blog/blog.zip"
          }
        }
        echo '部署完成'
      }
    }
  }
}
1
2
3
4
5
6
7
8
9
10
11
12
13
14
15
16
17
18
19
20
21
22
23
24
25
26
27
28
29
30
31
32
33
34
35
36
37
38
39
40
41
42
43
44
45
46
47
2
3
4
5
6
7
8
9
10
11
12
13
14
15
16
17
18
19
20
21
22
23
24
25
26
27
28
29
30
31
32
33
34
35
36
37
38
39
40
41
42
43
44
45
46
47
# 博客->触发规则
只需要勾选 推送到 blog 时触发构建

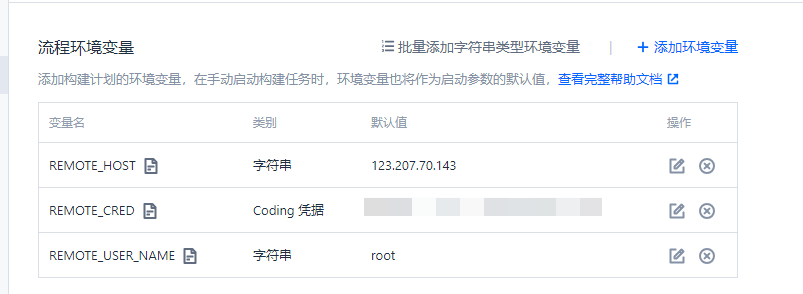
# 博客->变量与缓存添加
- REMOTE_HOST
- REMOTE_CRED
- REMOTE_USER_NAME
# 博客->nginx配置
server {
    server_name  blog.yueshuge.cn;
    root         /opt/work/blog;
    index index.html;
    location / {
    }
}
1
2
3
4
5
6
7
2
3
4
5
6
7
# 图库:
- 图库触发规则 、变量与缓存添加 与 博客 一致
- 图库服务器使用了docker方式 流程配置有一点点不同
# 图库-> 流程配置
pipeline {
  agent any
  stages {
    stage('检出') {
      steps {
        checkout([$class: 'GitSCM', branches: [[name: env.GIT_BUILD_REF]],
        userRemoteConfigs: [[url: env.GIT_REPO_URL, credentialsId: env.CREDENTIALS_ID]]])
      }
    }
    stage('构建') {
      steps {
        echo '构建中...'
        sh 'ls'
        sh 'tar -zcf ./images.zip ./*'
        sh 'ls'
        echo '构建完成.'
      }
    }
    stage('部署') {
      steps {
        echo '部署中...'
        script {
          def remote = [:]
          remote.name = 'web-server'
          remote.allowAnyHosts = true
          remote.host = '42.193.137.176'
          remote.port = 22
          remote.user = 'root'

         // 把「CODING 凭据管理」中的「凭据 ID」填入 credentialsId,而 username paswword 不用改
          withCredentials([usernamePassword(credentialsId: "点击项目配置->开发者选项->凭据管理->录入凭据->凭据类型选择用户名+密码", usernameVariable: 'username', passwordVariable: 'password')]) {
            remote.user = username
            remote.password = password

            // SSH 上传文件到远端服务器
            sshPut remote: remote, from: '/root/workspace/images.zip', into: '/opt/work/images/'
            // // 解压缩
            sshCommand remote: remote, sudo: true, command: "tar -zxf /opt/work/images/images.zip -C /opt/work/images/"
            sshCommand remote: remote, sudo: true, command: "rm -rf /opt/work/images/images.zip"
            # 拷贝到docker nginx中
            sshCommand remote: remote, command: "docker cp /opt/work/images/ nginx:/opt/work/"
          }
        }
        echo '部署完成'
      }
    }
  }
}
1
2
3
4
5
6
7
8
9
10
11
12
13
14
15
16
17
18
19
20
21
22
23
24
25
26
27
28
29
30
31
32
33
34
35
36
37
38
39
40
41
42
43
44
45
46
47
48
2
3
4
5
6
7
8
9
10
11
12
13
14
15
16
17
18
19
20
21
22
23
24
25
26
27
28
29
30
31
32
33
34
35
36
37
38
39
40
41
42
43
44
45
46
47
48
# 图库->nginx配置
server {
    server_name  img.yueshuge.cn;
    root         /opt/work/images;
    location / {
    }
}
1
2
3
4
5
6
2
3
4
5
6
# 4.博客常用配置
# 图片放大
npm install vuepress-plugin-image-viewer
# config.ts  插件配置中添加
[
	"vuepress-plugin-image-viewer", // 放大图片
	{
		selector: ".theme-vdoing-content",
	},
],
1
2
3
4
5
6
7
8
2
3
4
5
6
7
8
# 样式调整
palette.styl 底部添加

//内容框架全铺
.page .theme-vdoing-wrapper:not(.custom){
    max-width: 100%;
    margin: 0 auto;
    padding: 2rem 2.5rem;
    max-width: none;
}

//内容右上角日期右移
.articleInfo-wrap {
    max-width: none;
}

//内容全铺
.theme-vdoing-content:not(.custom) {
    max-width: none;
}

//页尾下一博客全铺
.page-nav {
    max-width: none;
}

//页尾目录全铺
.page .article-list:not(.custom){
    max-width: none;
}

//右侧内容目录
.right-menu-wrapper {
    margin-top: -160px;
}
1
2
3
4
5
6
7
8
9
10
11
12
13
14
15
16
17
18
19
20
21
22
23
24
25
26
27
28
29
30
31
32
33
34
35
2
3
4
5
6
7
8
9
10
11
12
13
14
15
16
17
18
19
20
21
22
23
24
25
26
27
28
29
30
31
32
33
34
35
# 5.看板娘设置
# 5.1插件安装
# 插件地址:https://github.com/JoeyBling/vuepress-plugin-helper-live2d
# 插件安装命令
yarn add vuepress-plugin-helper-live2d
# or
npm install vuepress-plugin-helper-live2d --save
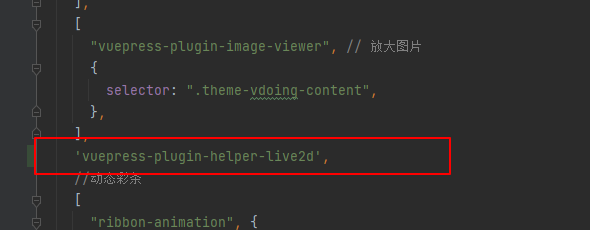
# 在config.ts --> plugins 中添加以下配置
'vuepress-plugin-helper-live2d',
1
2
3
4
5
6
7
2
3
4
5
6
7
# 5.2下载Live2D模型和导入
% 模型地址:https://gitee.com/rao_she/live2d_models_collect
1.下载模型
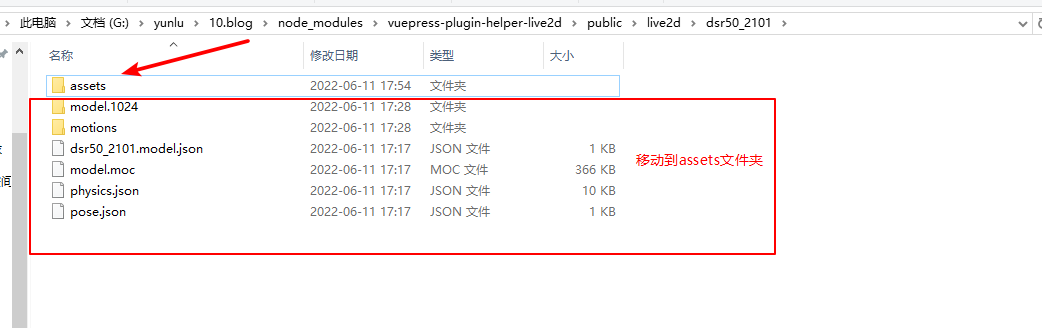
2.将 live2d_models_collect/live2D 中的模型复制到 blog/node_modules/vuepress-plugin-helper-live2d/public/live2d/ 文件夹下
3.修改模型目录 原模型包下没有assets包目录,先新建该目录,然后将其他文件都拖入该目录,入下图
1
2
3
4
2
3
4
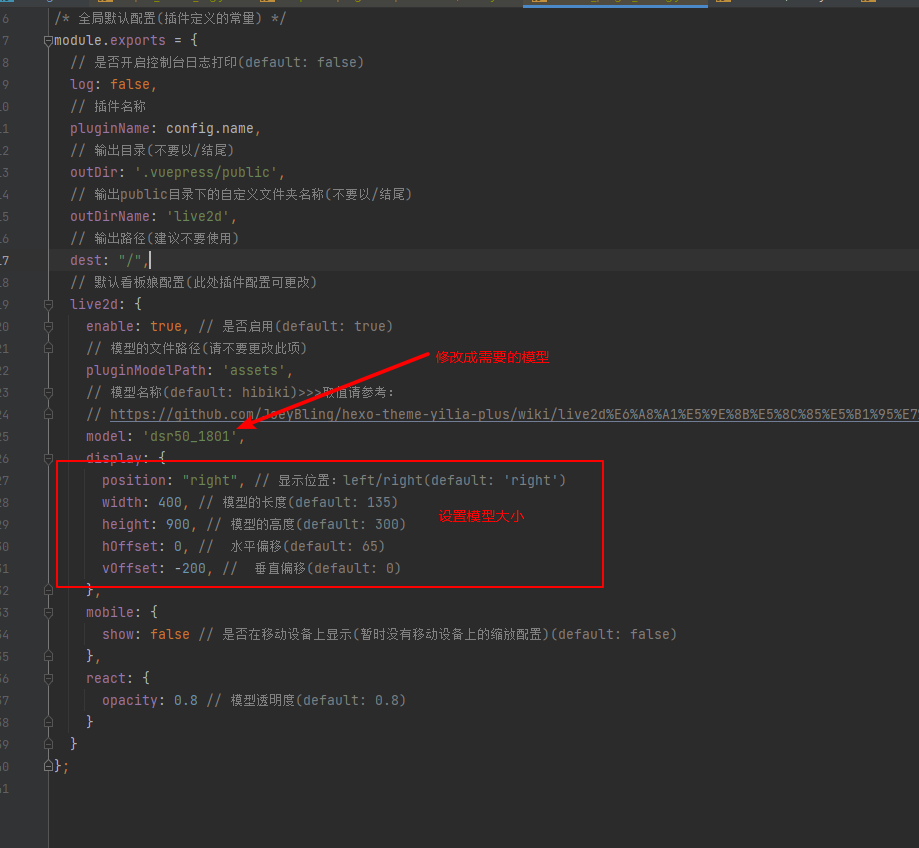
# 5.3修改插件
打开vuepress-plugin-helper-live2d下的 default_plugin_config.js 文件,修改信息
主要修改信息:
model: 修改成需要的模型
display: 修改模型的大小
1
2
3
2
3
# 代码片段
'use strict';

/** 默认配置 */
const config = require('./package.json');

/* 全局默认配置(插件定义的常量) */
module.exports = {
  // 是否开启控制台日志打印(default: false)
  log: false,
  // 插件名称
  pluginName: config.name,
  // 输出目录(不要以/结尾)
  outDir: '.vuepress/public',
  // 输出public目录下的自定义文件夹名称(不要以/结尾)
  outDirName: 'live2d',
  // 输出路径(建议不要使用)
  dest: "/",
  // 默认看板娘配置(此处插件配置可更改)
  live2d: {
    enable: true, // 是否启用(default: true)
    // 模型的文件路径(请不要更改此项)
    pluginModelPath: 'assets',
    // 模型名称(default: hibiki)>>>取值请参考:
    // https://github.com/JoeyBling/hexo-theme-yilia-plus/wiki/live2d%E6%A8%A1%E5%9E%8B%E5%8C%85%E5%B1%95%E7%A4%BA
    model: 'dsr50_1801',
    display: {
      position: "right", // 显示位置:left/right(default: 'right')
      width: 400, // 模型的长度(default: 135)
      height: 900, // 模型的高度(default: 300)
      hOffset: 0, //  水平偏移(default: 65)
      vOffset: -200, //  垂直偏移(default: 0)
    },
    mobile: {
      show: false // 是否在移动设备上显示(暂时没有移动设备上的缩放配置)(default: false)
    },
    react: {
      opacity: 0.8 // 模型透明度(default: 0.8)
    }
  }
};
1
2
3
4
5
6
7
8
9
10
11
12
13
14
15
16
17
18
19
20
21
22
23
24
25
26
27
28
29
30
31
32
33
34
35
36
37
38
39
40
2
3
4
5
6
7
8
9
10
11
12
13
14
15
16
17
18
19
20
21
22
23
24
25
26
27
28
29
30
31
32
33
34
35
36
37
38
39
40
# 6.问题记录
# 没有复制功能,CMD超级管理员进入项目目录
npm i vuepress-plugin-one-click-copy -D
1
2
2
上次更新: 2026/3/11 22:17:56